How to Implement Dynamic Rows System Config in Magento 2

Magento 2 system configuration is a very important part of any custom module. Whether you are developing a simple module or complex module, you have to provide some kind of configuration to operate that extension.
Magento 2 provides many UI components to make developer life easy. Among all UI components, Dynamic rows UI component is quite interesting. Dynamic rows UI components provide the functionality to store the data as a collection of records. It provides functionality to add, edit and delete rows as many as needed.
In this post, we will implement a text box and select box as a Dynamic row in System Configuration. We will see the only an important file, not the whole module.
Getting Started: Development
Step 1: Create system.xml file to add system configuration in backend.
<?xml version="1.0" ?>
<config xmlns:xsi="http://www.w3.org/2001/XMLSchema-instance" xsi:noNamespaceSchemaLocation="urn:magento:module:Magento_Config:etc/system_file.xsd">
	<system>
		<tab id="codextblog" sortOrder="999" translate="label">
			<label>Codextblog.com</label>
		</tab>
		<section id="dynamic_row" showInDefault="1" showInStore="1" showInWebsite="1" sortOrder="10" translate="label">
			<label>Dynamic Rows</label>
			<tab>codextblog</tab>
			<resource>Codextblog_Dynamicrows::config_codextblog_dynamicrows</resource>
			<group id="general" showInDefault="1" showInStore="1" showInWebsite="1" sortOrder="10" translate="label">
				<label>General</label>
				<field id="range" showInDefault="1" showInStore="1" showInWebsite="1" sortOrder="10" translate="label" type="select">
					<label>Add Range</label>
					<comment/>
					<frontend_model>Codextblog\Dynamicrows\Block\Adminhtml\Form\Field\Range</frontend_model>
					<backend_model>Codextblog\Dynamicrows\Model\System\Config\Backend\Range</backend_model>
				</field>
			</group>
		</section>
	</system>
</config>
Here you can see we have defined frontend_model and backend_model. frontend_model will display the dynamic rows html. backend_model will validate and save the data in database.
Step 2: Create backend model file Range.php
<?php

namespace Codextblog\Dynamicrows\Block\Adminhtml\Form\Field;

use Magento\Config\Block\System\Config\Form\Field\FieldArray\AbstractFieldArray;
use Magento\Framework\DataObject;
use Magento\Framework\Exception\LocalizedException;


/**
 * Class Range
 * @package Codextblog\Dynamicrows\Block\Adminhtml\Form\Field
 */
class Range extends AbstractFieldArray
{

    /**
     * @var
     */
    protected $startTimeRenderer;


    /**
     * @var
     */
    protected $endTimeRenderer;


    /**
     *
     */
    protected function _prepareToRender()
    {
        $this->addColumn('start_range', [
            'label' => __('From'),
            'renderer' => $this->getStartRangeRenderer()
        ]);
        $this->addColumn('end_range', [
            'label' => __('To'),
            'renderer' => $this->getEndRangeRenderer()
        ]);
        $this->addColumn('count', [
            'label' => __('Count'),
            'class' => 'required-entry validate-number',
            'style' => 'width:110px'
        ]);
        $this->_addAfter = false;
        $this->_addButtonLabel = __('Add');
    }


    /**
     * @return \Magento\Framework\View\Element\BlockInterface
     * @throws LocalizedException
     */
    private function getStartRangeRenderer()
    {
        if (!$this->startTimeRenderer) {
            $this->startTimeRenderer = $this->getLayout()->createBlock(
                StartRangeColumn::class,
                '',
                ['data' => ['is_render_to_js_template' => true]]
            );
            $this->startTimeRenderer->setClass('custom_start_range required-entry');
            $this->startTimeRenderer->setExtraParams('style="width:110px"');
        }
        return $this->startTimeRenderer;
    }


    /**
     * @return \Magento\Framework\View\Element\BlockInterface
     * @throws LocalizedException
     */
    private function getEndRangeRenderer()
    {
        if (!$this->endTimeRenderer) {
            $this->endTimeRenderer = $this->getLayout()->createBlock(
                EndRangeColumn::class,
                '',
                ['data' => ['is_render_to_js_template' => true]]
            );
            $this->endTimeRenderer->setClass('custom_end_range required-entry');
            $this->endTimeRenderer->setExtraParams('style="width:110px"');
        }
        return $this->endTimeRenderer;
    }


    /**
     * @param DataObject $row
     */
    protected function _prepareArrayRow(DataObject $row)
    {
        $options = [];
        $startTime = $row->getStartTime();
        if ($startTime !== null) {
            $options['option_' . $this->getStartTimeRenderer()->calcOptionHash($startTime)] = 'selected="selected"';
        }
        $endTime = $row->getEndTime();
        if ($endTime !== null) {
            $options['option_' . $this->getEndTimeRenderer()->calcOptionHash($startTime)] = 'selected="selected"';
        }
        $row->setData('option_extra_attrs', $options);
    }
}
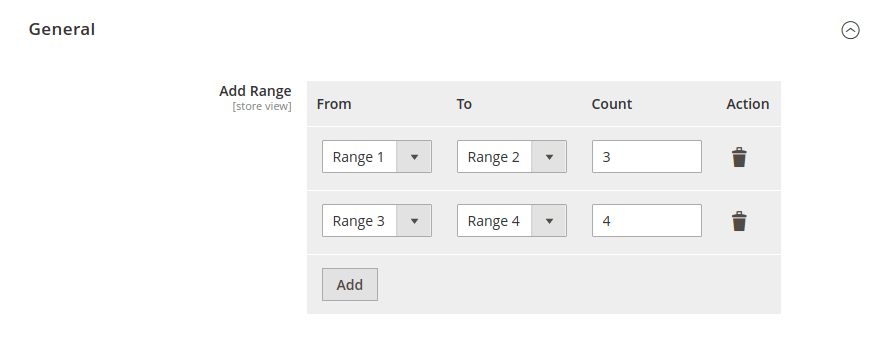
Here you can see inside function _prepareToRender we have implemented the three html columns. First is start range, second is end range and third is count. First two columns are render as a dropdown and third column is render as textbox.
To render a dropdown we need to create additional file that will render options of that dropdown.
Step 3: Create StartRangeColumn.php file and EndRangeColumn.php file
<?php

namespace Codextblog\Dynamicrows\Block\Adminhtml\Form\Field;

use Magento\Framework\View\Element\Html\Select;


/**
 * Class StartRangeColumn
 * @package Codextblog\Dynamicrows\Block\Adminhtml\Form\Field
 */
class StartRangeColumn extends Select
{

    /**
     * @param $value
     * @return mixed
     */
    public function setInputName($value)
    {
        return $this->setName($value);
    }


    /**
     * @param $value
     * @return StartRangeColumn
     */
    public function setInputId($value)
    {
        return $this->setId($value);
    }


    /**
     * @return string
     */
    public function _toHtml()
    {
        if (!$this->getOptions()) {
            $this->setOptions($this->getSourceOptions());
        }
        return parent::_toHtml();
    }


    /**
     * @return array
     */
    private function getSourceOptions()
    {
        $range = [];

        for ($i = 1;$i<=5;$i++) {
            $rangeText = "Range ".$i;
            $range[] = ['label' => $rangeText, 'value' => $i];
        }
        return $range;
    }
}
Now go to system > configurations > Codextblog.com > Dynamic Rows. You will see dynamic rows like the below screenshot.

If you save these fields, you will get an error because we have not implemented the backend_model yet.
Step 4: Create Range.php model file with below content.
<?php

namespace Codextblog\Dynamicrows\Model\System\Config\Backend;

use Magento\Framework\App\Cache\TypeListInterface;
use Magento\Framework\App\Config\ScopeConfigInterface;
use Magento\Framework\App\Config\Value as ConfigValue;
use Magento\Framework\Data\Collection\AbstractDb;
use Magento\Framework\Model\Context;
use Magento\Framework\Model\ResourceModel\AbstractResource;
use Magento\Framework\Registry;
use Magento\Framework\Serialize\SerializerInterface;


/**
 * Class Range
 * @package Codextblog\Dynamicrows\Model\System\Config\Backend
 */
class Range extends ConfigValue
{

    /**
     * @var SerializerInterface
     */
    protected $serializer;


    /**
     * Range constructor.
     * @param SerializerInterface $serializer
     * @param Context $context
     * @param Registry $registry
     * @param ScopeConfigInterface $config
     * @param TypeListInterface $cacheTypeList
     * @param AbstractResource|null $resource
     * @param AbstractDb|null $resourceCollection
     * @param array $data
     */
    public function __construct(
        SerializerInterface $serializer,
        Context $context,
        Registry $registry,
        ScopeConfigInterface $config,
        TypeListInterface $cacheTypeList,
        AbstractResource $resource = null,
        AbstractDb $resourceCollection = null,
        array $data = []
    ) {
        $this->serializer = $serializer;
        parent::__construct($context, $registry, $config, $cacheTypeList, $resource, $resourceCollection, $data);
    }


    /**
     * @return ConfigValue|void
     */
    public function beforeSave()
    {
        /** @var array $value */
        $value = $this->getValue();
        unset($value['__empty']);
        $encodedValue = $this->serializer->serialize($value);

        $this->setValue($encodedValue);
    }


    /**
     * @return ConfigValue|void
     */
    protected function _afterLoad()
    {
        /** @var string $value */
        $value = $this->getValue();
        if ($value) {
            $decodedValue = $this->serializer->unserialize($value);
            $this->setValue($decodedValue);
        }
    }
}
Now you can able to save these fields without any errors.
If you liked this post, then please like us on Facebook and follow us on Twitter.


Leave a Comment
(0 Comments)
Useful Magento 2 Articles
Author Info
Chirag
Connect With Me