How to Create Custom Tab under Product Edit Section in Magento 2

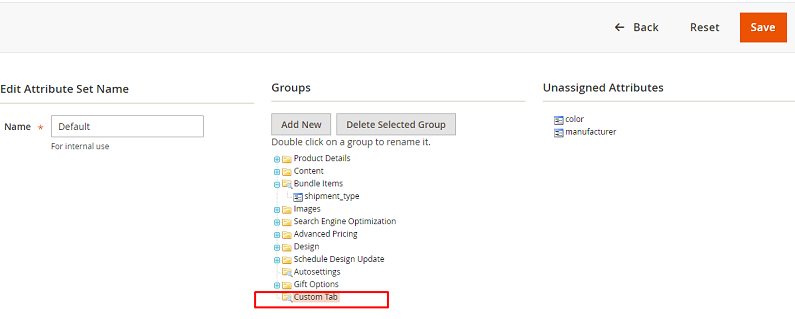
In one of my recent project, I need a custom tab under product edit section. We all know that we can achieve this by creating a new group in the attribute set. Go to Admin > Stores > Attributes and click Product. You will see the screen to create attribute group and place attribute in particular group. This is fine.

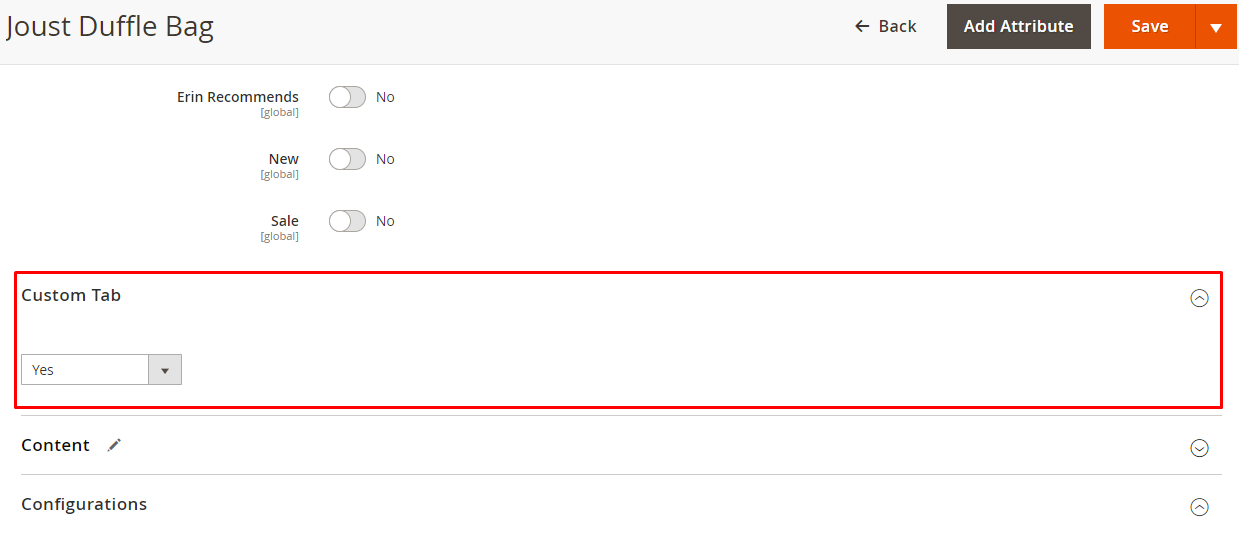
But what if we want to display custom tab and inside that tab we want to display content from a custom table. Well, In this tutorial we will create a custom tab in product edit section and display drop-down attribute which will display “yes” or “no” selection based on database value from our custom table.
To achieve this please create a new module by following steps.
Before Starting With Module Development
. I’m assuming that you have a working copy of Magento 2.1.X
. You are running Magento 2 in developer mode.
. Your Magento 2 cache is disabled.
Getting Started: Development
Step 1: Create module.xml file under the app/code/Codextblog/Customtab/etc directory
<?xml version="1.0"?>
<config xmlns:xsi="http://www.w3.org/2001/XMLSchema-instance" xsi:noNamespaceSchemaLocation="../../../../../lib/internal/Magento/Framework/Module/etc/module.xsd">
    <module name="Codextblog_Customtab" setup_version="1.0.0"></module>
        <sequence>
            <module name="Magento_Backend"/>
             <module name="Magento_Sales"/>
            <module name="Magento_Quote"/>
            <module name="Magento_Checkout"/>>
        </sequence>
</config>
This file contains the name and version of our module. When we upgrade our module with new database schema to add/edit/delete database field, we need to create upgrade schema file and mentioned the new version in setup_version attribute.
Step2: Create registration.php file under the app/code/Codextblog/Customtab directory
<?php

\Magento\Framework\Component\ComponentRegistrar::register(
    \Magento\Framework\Component\ComponentRegistrar::MODULE,
    'Codextblog_Customtab',
    __DIR__
);
This code will register our module in the Magento system.
Step 3: Create setup script file InstallSchema.php under the app/code/Codextblog/Customtab/Setup directory
<?php
namespace Codextblog\Customtab\Setup;

use Magento\Framework\Setup\InstallSchemaInterface;
use Magento\Framework\Setup\ModuleContextInterface;
use Magento\Framework\Setup\SchemaSetupInterface;
use Magento\Framework\DB\Adapter\AdapterInterface;
use Magento\Framework\DB\Ddl\Table;

class InstallSchema implements InstallSchemaInterface
{
public function install( SchemaSetupInterface $setup, ModuleContextInterface $context )
 {
      $installer = $setup; $installer->startSetup();

        /**
         * Create table 'posts'
         */
        $table = $installer->getConnection()->newTable(
            $installer->getTable( 'customtab' )
        )->addColumn(
            'id',
            Table::TYPE_INTEGER,
            null,
            [ 'identity' => true, 'nullable' => false, 'primary' => true ],
            'ID'
        )->addColumn(
            'product_id',
            Table::TYPE_INTEGER,
            255,
            [ 'nullable' => false ],
            'Product Id'
        )->addColumn(
            'created_time',
            Table::TYPE_TIMESTAMP,
            null,
            [ 'nullable' => false, 'default' => Table::TIMESTAMP_INIT_UPDATE ],
            'Creation Time'
        )->setComment(
            'Custom Tab Table'
        );

        $installer->getConnection()->createTable( $table );

        $installer->endSetup();

    }
}
Like Magento 1, this setup script will run only one time. This script creates ‘customtab’ table in the database. In ‘setup_module’ table you can see the module name ‘Codextblog_Customtab’ with schema version 1.0.0
Step 4: Create Model files. Like Magento 1, Magento 2 also need Model, Resource Model, and Collection model files. Apart from these three models files Magento 2 also need factory object class.
Create Customtab.php file under app/code/Codextblog/Customtab/Model directory.
<?php
namespace Codextblog\Customtab\Model;

class Customtab extends \Magento\Framework\Model\AbstractModel
{
/** * Initialize resource model
 * * @return void
 */
protected function _construct()
 {
   $this->_init('Codextblog\Customtab\Model\ResourceModel\Customtab');
 }
}
Create CustomtabFactory.php file under app/code/Codextblog/Customtab/Model directory.
<?php
namespace Codextblog\Customtab\Model;

class CustomtabFactory
{
/** * @var \Magento\Framework\ObjectManagerInterface
 */
protected $_objectManager;
/** * @param \Magento\Framework\ObjectManagerInterface $objectManager
*/
public function __construct(\Magento\Framework\ObjectManagerInterface $objectManager)
 {
   $this->_objectManager = $objectManager;
 }

    /**
     * Create new country model
     *
     * @param array $arguments
     * @return \Magento\Directory\Model\Country
     */
    public function create(array $arguments = [])
    {
        return $this->_objectManager->create('Codextblog\Customtab\Model\Customtab', $arguments, false);
    }
}
Create Customtab.php resource model file under app/code/Codextblog/Customtab/Model/ResourceModel/ directory
<?php
namespace Codextblog\Customtab\Model\ResourceModel;

class Customtab extends \Magento\Framework\Model\ResourceModel\Db\AbstractDb
{
    /**
     * Initialize resource model
     *
     * @return void
     */
    protected function _construct()
    {
        $this->_init('customtab', 'id');
    }
}
Create Collection.php file under app/code/Codextblog/Customtab/Model/ResourceModel/Customtab directory
<?php
namespace Codextblog\Customtab\Model\ResourceModel\Customtab;
class Collection extends \Magento\Framework\Model\ResourceModel\Db\Collection\AbstractCollection
{
/** * Define resource model
* * @return void
*/
protected function _construct()
{
       $this->_init('Codextblog\Customtab\Model\Customtab', 'Codextblog\Customtab\Model\ResourceModel\Customtab');
        $this->_map['fields']['page_id'] = 'main_table.page_id';
    }

}
Now it’s time to create a custom tab in product admin form. To create it, first we have to declare modifier in app/code/Codextblog/Customtab/etc/adminhtml/di.xml file
<?xml version="1.0"?>
<config xmlns:xsi="http://www.w3.org/2001/XMLSchema-instance" xsi:noNamespaceSchemaLocation="urn:magento:framework:ObjectManager/etc/config.xsd">
   <virtualType name="Magento\Catalog\Ui\DataProvider\Product\Form\Modifier\Pool">
        <arguments>
            <argument name="modifiers" xsi:type="array">
                <item name="custom-tab-with-content" xsi:type="array">
                    <item name="class" xsi:type="string">Codextblog\Customtab\Ui\DataProvider\Product\Form\Modifier\CustomTab</item>
                    <item name="sortOrder" xsi:type="number">10</item>
                </item>
            </argument>
        </arguments>
    </virtualType>
</config>
Modifier is a part of Magento 2 UI Component. Now Create modifier class CustomTab under app/code/Codextblog/Customtab/Ui/Dataprovider/Product/Form/Modifier directory
<?php
namespace Codextblog\Customtab\Ui\DataProvider\Product\Form\Modifier;

use Magento\Catalog\Model\Locator\LocatorInterface;
use Magento\Catalog\Ui\DataProvider\Product\Form\Modifier\AbstractModifier;
use Magento\Framework\Stdlib\ArrayManager;
use Magento\Framework\UrlInterface;
use Magento\Ui\Component\Container;
use Magento\Ui\Component\Form\Fieldset;
use Codextblog\Customtab\Model\CustomtabFactory;

class CustomTab extends AbstractModifier
{

    const SAMPLE_FIELDSET_NAME = 'custom_fieldset';
    const SAMPLE_FIELD_NAME = 'is_custom';


    protected $_backendUrl;
    protected $_productloader;
    protected $_modelCustomtabFactory;

    /**
     * @var \Magento\Catalog\Model\Locator\LocatorInterface
     */
    protected $locator;

    /**
     * @var ArrayManager
     */
    protected $arrayManager;

    /**
     * @var UrlInterface
     */
    protected $urlBuilder;

    /**
     * @var array
     */
    protected $meta = [];

    /**
     * @param LocatorInterface $locator
     * @param ArrayManager $arrayManager
     * @param UrlInterface $urlBuilder
     */
    public function __construct(
        LocatorInterface $locator,
        ArrayManager $arrayManager,
        UrlInterface $urlBuilder,
        CustomtabFactory $modelFriendFactory,
        \Magento\Catalog\Model\ProductFactory $_productloader,
        \Magento\Backend\Model\UrlInterface $backendUrl
    ) {
        $this->locator = $locator;
        $this->arrayManager = $arrayManager;
        $this->urlBuilder = $urlBuilder;
        $this->_modelCustomtabFactory = $modelFriendFactory;
        $this->_productloader = $_productloader;
        $this->_backendUrl = $backendUrl;
    }

    public function modifyData(array $data)
    {
        return $data;
    }

    public function modifyMeta(array $meta)
    {
        $this->meta = $meta;
        $this->addCustomTab();

        return $this->meta;
    }

    protected function addCustomTab()
    {
        $this->meta = array_merge_recursive(
            $this->meta,
            [
                static::SAMPLE_FIELDSET_NAME => $this->getTabConfig(),
            ]
        );
    }

    protected function getTabConfig()
    {
        return [
            'arguments' => [
                'data' => [
                    'config' => [
                        'label' => __('Custom Tab'),
                        'componentType' => Fieldset::NAME,
                        'dataScope' => '',
                        'provider' => static::FORM_NAME . '.product_form_data_source',
                        'ns' => static::FORM_NAME,
                        'collapsible' => true,
                    ],
                ],
            ],
            'children' => [
                static::SAMPLE_FIELD_NAME => [
                    'arguments' => [
                        'data' => [
                            'config' => [
                                'label' => null,
                                'formElement' => \Magento\Ui\Component\Form\Element\Select::NAME,
                                'componentType' => \Magento\Ui\Component\Form\Field::NAME,
                                'dataScope' => static::SAMPLE_FIELD_NAME,
                                'options' => $this->getCustomtaboption(),
                                'value' => $this->getCustomtabSelectedOptions(),
                                'dataType' => \Magento\Ui\Component\Form\Element\DataType\Number::NAME,
                                'sortOrder' => 10,
                                'required' => true,
                            ],
                        ],
                    ],
                    'children' => [],
                ],
            ],
        ];
    }

    protected function getCustomtaboption() {
        $getChooseOptions = [];
        $getChooseOptions[] = [
            'label' => 'Choose Options',
            'value' => '-1',
        ];
        $getChooseOptions[] = [
            'label' => 'Yes',
            'value' => '1',
        ];
        $getChooseOptions[] = [
            'label' => 'No',
            'value' => '2',
        ];
        return $getChooseOptions;
    }


    protected function getCustomtabSelectedOptions() {


        $currentproduct = $this->locator->getProduct()->getId();
        $CustomtabModel = $this->_modelCustomtabFactory->create();
        $CustomtabModel->load($currentproduct, 'product_id');
        if($CustomtabModel->getId())
         return 1;
        else
         return 2;


    }
}
Let’s understand this file in a more detail. We have injected “CustomtabFactory” factory class and “ProductFactory” in construct function to use an object in other functions of a class. The “addCustomTab” function is responsible for creating custom tab under product edit form. This form internally calling “getTabConfig” function which is rendering select element. The “getCustomtaboption” function fetching options from a dropdown list. The “getCustomtabSelectedOptions” function is eventually querying our custom table and check whether a current product exists or not. If current product id is existing then it is set to value “Yes”.
After following steps you will get result.

In the upcoming tutorial, we will see how we can add custom grid into a custom tab. If you liked this post, then please like us on Facebook and follow us on Twitter.

Leave a Comment
(9 Comments)
Hi , thank you ,
I will check again
I used magento 2.2.3 .the module is installed , but when I click in fiche product ; the server is 500
I followed all the steps, but I will have a 500 error
Hello Amin,
there are many reasons for getting 500 error. Anyway, I have your email address. I’m sending you the code.
Hi,
This is a good explanation for creating tab in product page…How to create a admin grid in this tab?
Hello Maha,
I will write a tutorial on How to display custom admin grid in product page very soon.
Hi,
Any details on when the tutorial “How to display custom admin grid in product page” is online?
Hello Maha,
Display custom admin grid in product page is published. Please check this link https://goo.gl/cU679F
Hello Roel,
It is online now Please check this link https://goo.gl/cU679F
Useful Magento 2 Articles
Author Info
Chirag
Connect With MeWas this post helpful? Please support Us!
To Avoid Spam Downloads, We Want Your Email
away. Please submit form below.
Magento 2
Knowledge
to your Inbox